Thursday, November 05, 2009

Eigenvector Calculation with MATLAB vs Mathematica

We have realized that eigenvector calculation for a square matrix whose eigenvalues are all zero must be done by symbolic toolbox in MATLAB. Otherwise MATLAB gives the wrong answer. Or, you can use Mathematica instead. Since Mathematica is able to calculate eigenvectors numerically for this case.
Here is the example:
Consider such a 6x6 square matrix:
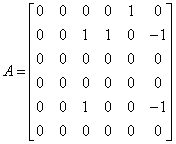
In MATLAB, try to calculate eigenvectors numerically:
%% Eigencvector calculation:: Directly numerical
A1=[0 0 0 0 1 0;0 0 1 1 0 -1;0 0 0 0 0 0;0 0 0 0 0 0;0 0 1 0 0 -1;0 0 0 0 0 0];
[v1,l1]=eig(A1)

Matlab gives eigenvectors as:
which is wrong!.

However by symbolic toolbox:

%% Eigencvector calculation: Using symbolic toolbox
A2=sym([0 0 0 0 1 0;0 0 1 1 0 -1;0 0 0 0 0 0;0 0 0 0 0 0;0 0 1 0 0 -1;0 0 0 0 0 0]);
[v2,l2]=eig(A2)
That's now ok!

%% Cross checking with "null space" concept
%Altough we define matrix numerically, null space of A1 however gives numerically true eigenvector familiy:
null(A1)
And finally here is the Mathematica screenshot:
Mathematica calculates successfully:

Labels: , ,

Wednesday, November 04, 2009

How to create mplayer playlist in Ubuntu

1 - Open a terminal within your directory that includes the media files ("mp3" for this case) to be added to the playlist.

2 - Use find command with -name option to list files (lists recursively by default) and send this list into your "playlistName.m3u" ("Totem Player" in Ubuntu considers .m3u files)

Here is the script: (GNOME Terminal 2.28.1)

$find -name '*.mp3' >playlistName.m3u


Labels:

Thursday, October 15, 2009

How to read Binary Data File in C (Sequentially)

Exactly two lines have to be changed from ASCII file mode given here.
Differences from ASCII mode:
1 - Additional "b" for fopen()
2 - Usage of fread() instate of fscanf
*/
...
fp = fopen(i_filename, "rb"); // read a binary file ("r" and "b")
...
/* loop until all data keep into array */

while( (!feof(fp))){
//fscanf(fp, "%f", &value); you can not use this any more for binary files. Now you have have to use fread()
fread(&value, sizeof(FP32), 1, fp);
...
}

Labels: , ,

Wednesday, August 19, 2009

Türkçe Karakterlerin Unicode karşılıklarını bulmak ve kullanmak

Start->Run->charmap ile Character Map açılır.
Buradaki harflerin unicode karşılıkları Character Map penceresinin en sonunda "U+0130" şeklinde gösterilir.
Bu unicode karakteri yazarken ortadaki "+" işareti kullanılmaz be başa bir "\" işareti koyulur. Örnek: I harfinin unicode'u U+0049 dur, \u0049 şeklinde kullanılır.

Labels:

Tuesday, August 18, 2009

Kendinden enerjili eski mayın arama / patlatma aracı

"Self energized" robotlara baktım biraz ama cok birşey bulamadım. Birtane "spring loaded" kendi kendine zıplayan bir robot var. Neyse, mekanizması nasıl olur bilemiyorum ama birileri herhalde biliyordur.


Merak ettiğim konu şu:

Küre şeklinde olan, toprakta ve taşlık arazide hızlıca ilerleyebilecek minik keskin uçlu birrçok ayağı bulunan bir araç yapılabilse. Bu aracın boyu da normal bir insan eli kadar olsa. Ayrıca, üzerindeki sıkıştırılmış yay mekanizmalarından güç sağlasa (1km kadar ilerleseler yeter mi?) ve ucuzca üretilebilse. Bunlardan birçoğu (mesela 1000 tanesi) mayınlı olduğu düşünülen yada bilinen araziye salınsa. Acaba mayın temizlemede veya mayından korunmada bir yöntem olabilir mi?

Neyse bu arada araştırma yaparken birazcık da self energized robotlar ve uzun süredir merak ettiğim yay mekanizmalarına da bakarız. Bilen anlatsın. Mekanizmalar kitabında var mıdır ki?


Labels: ,

Monday, August 17, 2009

How to add an image to a JPanel

In case of using Netbeans IDE Palettes for GUI building, in order to insert an image into JPanel, you have to change the layout of panel to "Border Layout". Then you have to use a JLabel to pass the image into JPanel.

I have tried many ways but this worked fine for me:

ImageIcon picturetoInsert = newImageIcon("C:/images/anyimage.gif");
JLabel label = new JLabel("",picturetoInsert,JLabel.CENTER);
pPanel.add(label,BorderLayout.CENTER);


Labels: ,

Tuesday, July 28, 2009

How to read (ASCII) data file in C

/*Function that reads the data file into an array and returns a pointer that points to this array of FP32*/

FP32* readData(const char *i_filename){

FILE *fp;
fp = fopen(i_filename, "r"); //open file , read only
INT32U numElements = 0;
FP32 value; //keep value at pointer position
FP32 *array=NULL; //set to NULL because of realloc
/* loop until all data keep into array */

while( (!feof(fp))){
fscanf(fp, "%f", &value);
array = (FP32 *) realloc (array,(numElements+1) * sizeof(FP32 *));
array[numElements++] = value;
}
/* shift array and add "size of array" to its first element
since there is no way to get size of an array from its FP32 pointer*/

INT32U i;
array = (FP32 *) realloc (array,(numElements+1) * sizeof(FP32 *));
for(i=numElements;i>0;i--){
array[i]=array[i-1];
}
array[0]=numElements;
/* close file */
fclose(fp);
return array;
}

Labels: , ,

Friday, July 17, 2009

DIY: How to Replace Subaru Forester Spark Plugs

It has been 30K [km] and almost a year since my last spark plug change (That was first for me). So, today i bought four NGK Spark Plugs from one of (Official Service) Subaru Dealers in Ankara and replaced them.

For now this post is copied as is from Wikimechanist.
The upcoming posts that can be named as "mechanic" will be posted only to Wikimechanist.


1 - Remove air filter elements going to the air filter to get free space:


2 - Remove Spark plug cables:


3 - Remove Spark plugs with suitable socket. That is 16 mm.
Also you'll need torque wrench to tighten with proper torque. If you have not one. Turn spark plugs 1/2 to 1/4 turn after contact occurs.


The previous change was 30K [km] before. You can see the old and the new spark plugs. The clean one is new of course. It must have 1 - 1.1 mm gap. If not adjust it.


For the driver side plugs, you need to remove window washer water container.
But not fully removal is needed. You may fix it with some elastic holders after turning it a little. You may have enough space to handle replacement of spark plugs.


Update (02.01.2010) some pictures for driver side plug removal:


Good luck.
It is pretty easy. Just half an hour for me.

Labels: ,

Friday, July 10, 2009

Forester arka camındaki örümcek ağı

Labels:

Thursday, July 09, 2009

How to Change Rear Differential Oil of Subaru Forester

Step 1: Lift up vehicle a little bit. Since you'll need some free space to handle 24'' wrench to loosen the differential 1/2" plugs.


Step 2: Loosen the upper plug first. If you can not be succeed still you will have a chance to call mechanic. Otherwise the lower plug will drain the oil.
The oil will start to bleed a little. Put your waste oil container below the plug.


Step 3: Now loosen the lower plug and drain the full oil.


Step 4: Differential needs 0.8 liters of 75-90 GL-5 performance level oil. You may need a plastic pipe to reach differential. I choose a plastic container and put a pipe on it. Fill up the differential till it starts bleeding from the upper plug hole.


Tightening torque for the plugs: 49 NM
Thnx to:
subruforester.org

Labels:

Friday, June 26, 2009

Windows Media Player için Playlist oluşturmak

Windows Media Player için Playlist oluşturmak:
External HDD de tuttuğum müziklere ayrı ayrı playlist oluşturmak için kısaca şu ms dos komutlarını kullanıyorum:
Örneğin:
1 - hdd de music dizini olsun. Buraya cmd komutu ile command window aç.
2 - playlist oluşturmak istediğin dizine git "cd dizin_ismi"
3 - dir /S (recursively) /B (without headers) *.mp3 (sadece mp3 leri al) > ../playlist_ismi.m3u (bir yukarıdaki dizine "palylist_ismi.m3u" dosyası olarak kaydet)
4 - palylist_ismi.m3u üzerine çift tıkla WMP açılır çalmaya başlar.


Labels:

Thursday, January 22, 2009

Windows'ta Netbeans 6.5 ile C geliştirme

Netbeans-6.5'i indir.
Netbeans-6.5 icin c/c++ development package'ini indir.
Netbeans-6.5 i kur.
Netbeans -6.5 icin c/c++ dev. pack'i kur.
MinGW-5.1.4'u indir ve kur. -> gcc for windows
MSYS'i (Not: Bu direct link değil, direct link versen de sonradan kırılır.Buradan MSYS yi kendin bulacaksın) indir ve kur-> kurulumda MinGW'nin yerini soracak ve Netbeans icin gerekli gmake'i kuracaktır.
Artık Netbeans, C/C++ projesi oluşturulmak istendiğinde otomatik olarak C compiler ve tools ayarlarını yapacaktır.
Eger hala make icin ne kullanacagını bulamamışsa : "dizin ismi":\msys\1.0\bin\make.exe'yi kullanmasını sağla.

Labels: , ,

Saturday, January 17, 2009

SUN SOLARIS 10'a gcc ve ada compiler kurmak

Makinada internet baglantisi varsa:
Adım 1:
# pkgadd -d http://blastwave.network.com/csw/pkg_get.pkg
eğer pkgadd şu hatayı verirse:
ERROR: attempt to process datastream failed
- bad format in datastream table-of -contents
http://www.blastwave.org/pkg_get.pkg dosyasını indir
ve

# pkgadd -d pkg_get.pkg

komutu ile kur.

Adım 2:
# gedit /opt/csw/bin/pkg-get.conf
komutu ile config dosyasını aç ve mirror linkini şu şekilde değiştir.
url = http://blastwave.network.com/csw/unstable

Adım 3:
gcc ve gnat'ı şu komutlarla kur:
# pkg-get install gcc4core
# pkg-get install gcc4ada
pkg-get'in faydası: 1 - tek komutla indirip kurmak.
2 - dependency'leri kendisi bulur ve kurar.
Adım 4:
gedit editorü ile profile dosyasını aç:
# gedit .etc.profile
ve dosyanın sonuna şu şatırları ekle.
PATH=${PATH}:/opt/csw/bin:/opt/csw/gcc4/bin;export PATH
-- dikkat ederseniz PATH'e /opt/csw/bin dizinini de eklemek gerek. Çünkü gcc "gas"'ı kullanıyor.
Böylece birdahaki açılışta gcc, gnat ve pkg-get fonksiyonlarına direkt ulaşılabilir.

Makinada internet baglantisi yoksa:

Bu durumda ilgili packagelari da iceren su dosyalari blastwave.org'dan indirip pkgadd ile kurmak gerekiyor:

libiconv-1.9.2-SunOS5.8-i386-CSW.pkg.gz

gcc4corert-4.0.2,REV=2005.09.29-SunOS5.8-i386-CSW.pkg.gz

gcc4core-4.0.2,REV=2005.09.29-SunOS5.8-i386-CSW.pkg.gz

gcc4adart-4.0.2,REV=2005.09.29-SunOS5.8-i386-CSW.pkg.gz

gcc4ada-4.0.2,REV=2005.09.29-SunOS5.8-i386-CSW.pkg.gz

common-1.4.6,REV=2008.04.28-SunOS5.8-i386-CSW.pkg.gz

binutils-2.17-SunOS5.8-i386-CSW.pkg.gz

Labels: , ,