Thursday, August 12, 2010

DIY: Subaru Forester Spark Plug Wire Set Replacement

I replaced the old OEM spark plug wire set with Exact OEM fit of NGK FX54 8772 Wire Set.
Although the old wire set resistance values were still in bound of the spec, i decided to change them since they were very close to the upper limit. Here are the resistance values per cable:

Wire order:
rear of car
   3 4
   1 2
 front o car

 Wire resistance of my forester and Ref. values:
           
                Wire resistance of my Forester:     Wire resistance specs:
                 [kOhms]                                       [kOhms]

#1 cord:     12.3                                             7.40 — 17.27
#2 cord:     11.6                                             6.24 — 14.56
#3 cord:     11.8                                             6.54 — 15.25
#4 cord:     14.6                                             6.59 — 15.37

Replacement was very easy it took about 10 minutes. NGK indicates the cylinder lead ID on each cord.
Start with putting the spark plug part of cord first and then continue with following the same way with the old wire, that is it.

I bought wire set from www.ClubPlug.net of CA. They got it from NGK dist. on Thursday and sent to Toronto by the Prulator next day shipping at around 4:30 pm. It was at the hotel by 10:30 am. I should send my thanks to them, of course also to my friend Murat who brought them to me.


Labels: ,

Monday, July 05, 2010

DIY: Subaru Forester Front Hub Bolt Replacement

Start of the driver side axle boot replacement was ended with replacement of the hub bolt. I broke it while removing the wheel nut. That was easy to replace took about 20-25 minutes.
  • Remove brake center and fix with a plastic holder.
  • Remove disk.
  • Remove small 10 mm nuts.
  • Replace broken hub bolt.
  • Do not try to fix completely before installing the wheel. It will be pulled by the wheel nut.

    Labels: , ,

    Saturday, May 29, 2010

    DIY:Subaru Forester CV Boot Replacement

    1.Removal of CV shaft:
    1.1Remove CV nut: Use 32 mm socket.
    1.2Remove lower ball joint: You may use pickle fork to apply leverage between spindle and the ball joint. Also ball joint puller may be used . Some people apply some grease to the fork not to break ball joint plastic boot. [!] I did not need any fork or puller. Removed 14mm pin, made a moment arm with two socket expansions and apllied moment between the spindle and the ball joint [See Collage[3]].
    1.3Break free the axle from the spindle.
    1.3.1[!] For exact straight pull of axle, i fixed the disk to the right side with a rope.[See Collage[5]
    1.4Pull the whole axle shaft.
    2.Replacement of the CV Boot:
    2.1Remove CV Boot:
    2.1.1Use pinch plier to remove big pich inside and the smaller one at the engine side.
    2.2Greasing:
    3.Install CV Axle:

    References:
    [1] Removal of CV shaft
    [2] subaruoutback.org DIY forums


    Collage[1]

    Collage[2]

    Collage[3]

    Collage[4]

    Collage[5]

    Collage[6]

    Collage[7]

    Collage[8]


    Collage[9]

    Labels: , , ,

    Saturday, April 03, 2010

    DIY: Subaru Forester Steering Rack Boot Replacement

    Remove  the old boot: 
    Using a small pliers or a screwdriver remove band from boot. Band can not be removed properly, i had to cut it since it was melded. Here, be careful to keep pipe connections free from pliers (or what tool you are using) while removing the band. 
    The small clip can be used again if you remove it carefully. All you have to do is to press to both sides with a pliers.
    Install new boot:
    I prefer removing the tie-rod end to put the new boot. Im not sure but if you have a lift, you may remove inner tie-rod without dealing with rod end.

    Update: I found a very very helpful Steering rack boot replacement thread on subaruoutback.org. As i declared above, it also implies the need of tie-rod end removal.
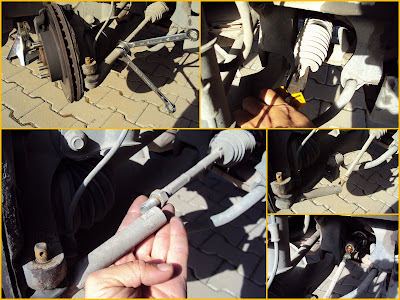
    But today i have seen that it is not really needed, if you jack up the vehicle. It is possible to break the locking nut with two 19 mm combination wrenches and go on twisting the rod and break it into two pieces. After removing the 19 mm nut you can replace the boot.

    Some lessons learned: The old clip did not fit to the boot. Consider using some plastic fold locking cuff. And fix the small end of the boot after installing tie rod. If you fix it before it will twist and break.

    Some pictures:


    Labels: , ,

    Wednesday, January 20, 2010

    DIY: Subaru Forester Engine Coolant Water Container Clean&Refill

    As a standard normal procedure, i was adding some front window cleaner solvent to my forester. I was lucky that i have examined my fault before running engine: I filled the wrong container. Yes, it was the engine coolant container that filled up to head. So what i have done, after some phone call with my older brother Bülent (Like anytime that i have to take a very fast and brillant answer) was removing and cleaning the coolant water container.


    Labels: ,

    Friday, July 17, 2009

    DIY: How to Replace Subaru Forester Spark Plugs

    It has been 30K [km] and almost a year since my last spark plug change (That was first for me). So, today i bought four NGK Spark Plugs from one of (Official Service) Subaru Dealers in Ankara and replaced them.

    For now this post is copied as is from Wikimechanist.
    The upcoming posts that can be named as "mechanic" will be posted only to Wikimechanist.


    1 - Remove air filter elements going to the air filter to get free space:


    2 - Remove Spark plug cables:


    3 - Remove Spark plugs with suitable socket. That is 16 mm.
    Also you'll need torque wrench to tighten with proper torque. If you have not one. Turn spark plugs 1/2 to 1/4 turn after contact occurs.


    The previous change was 30K [km] before. You can see the old and the new spark plugs. The clean one is new of course. It must have 1 - 1.1 mm gap. If not adjust it.


    For the driver side plugs, you need to remove window washer water container.
    But not fully removal is needed. You may fix it with some elastic holders after turning it a little. You may have enough space to handle replacement of spark plugs.


    Update (02.01.2010) some pictures for driver side plug removal:


    Good luck.
    It is pretty easy. Just half an hour for me.

    Labels: ,

    Friday, July 10, 2009

    Forester arka camındaki örümcek ağı

    Labels:

    Thursday, July 09, 2009

    How to Change Rear Differential Oil of Subaru Forester

    Step 1: Lift up vehicle a little bit. Since you'll need some free space to handle 24'' wrench to loosen the differential 1/2" plugs.


    Step 2: Loosen the upper plug first. If you can not be succeed still you will have a chance to call mechanic. Otherwise the lower plug will drain the oil.
    The oil will start to bleed a little. Put your waste oil container below the plug.


    Step 3: Now loosen the lower plug and drain the full oil.


    Step 4: Differential needs 0.8 liters of 75-90 GL-5 performance level oil. You may need a plastic pipe to reach differential. I choose a plastic container and put a pipe on it. Fill up the differential till it starts bleeding from the upper plug hole.


    Tightening torque for the plugs: 49 NM
    Thnx to:
    subruforester.org

    Labels: